Monday, April 2, 2012

Hey, Everyone, check this out


One life on this earth is all that we get, whether it is enough or not enough, and the obvious conclusion would seem to be that at the very least we are fools if we do not live it as fully and bravely and beautifully as we can. –Frederick Buechner


Are you a dreamer?

Do you have ideas, dreams and a beautiful product to go with it?

Have you been putting off starting your own business?

Do you feel stuck in the online business you have already created?

Do you just need someone to take your hand and walk you through the process?

It is time to take yourself and your dreams seriously.

Let’s start at the beginning.

Join me for a three week journey in building a “Creatively Made Business”.

SOME of the topics we will cover …..

Setting up your business

Websites

Social networking

Promoting your business

Pricing and staying competitive

Photographing your product

Setting yourself apart

Growing your brand

Markets and shows

Manufacturing

Reproducing your work

Keeping the books

Balancing home and creativity

I will share my journey

I will talk honestly about what worked and what didn’t.

I will talk about growing pains and when you will know it is time to expand.

I will talk about all the things I wish someone had told me before I started to manufacture my clothing and bags (all the mistakes I made too).

Each week you will hear from other guest business owners and they will share what they wish they would have known and give you their best piece of advice.

You will have access to a Facebook group so you can connect with other business owners (or dreamers) in the class.

Each week we will have a live chat where you can ask questions.

All sessions are recorded and available as videos for you to watch at your convenience. You will learn at your own pace and around your own schedule.

Growth, dreams and possibilities begin April 16th.

Registration is now open.

{class will begin April 16th and the classroom will be open for 3 months}

$48 for the course

NO COUPON CAN BE APPLIED TO THIS COURSE


Monday, March 12, 2012

Farm Digi Kit Now Availble

Moo...

Here is a layout using the kit by Linda, one of the wonderful Creative Team over at www.NDISB.com

You can find it HERE


Old MacDonald Had a Farm

Wednesday, February 8, 2012

Ruffled Tee Shirt Scarf


This is a simple scarf to make. Take a paper plate and trace around the plate on flattened and smoothed tee shirt, with a chalk pencil.


Then using scissors cut out circles.


Next, cut around inside of circle in about 2 inch borders, leaving a circle at the end.


Now when you stretch out each circle you will have a long strip. Divide the strips into two even piles. Gather them all together at the circle end and sew together overlapping about 2 inches this is the back of the scarf.

You now have a lovely ruffled scarf.

Sunday, January 22, 2012

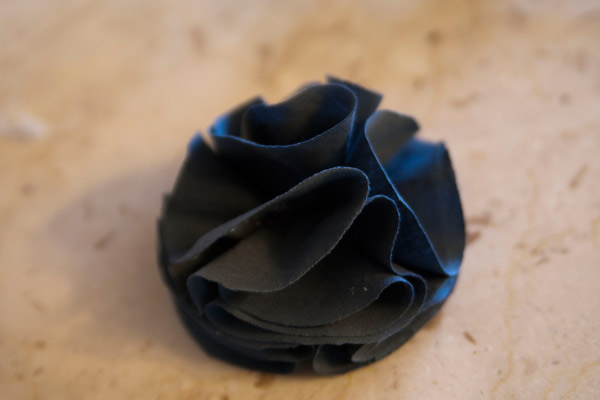
Tee Shirt Flowers


You could do this with any fabric but I used the extra from the tee shirts I used to make the scarves.

Cut 8 circles to make one flower. I used a quart paint can as my pattern and it was the size I wanted. You will need one 2 inch circle of felt for your base and about a 12 inch string to tie your flower to your project. The string is optional. However I used my flowers on my scarves and wanted to be able to remove them at will.

Plug in your hot glue gun so it is heating up and have your extra glue sticks close at hand. Fold each circle in half and then in half again so they are now all in quarters. Take your felt circle and put a good circle of glue in the middle, if using a string tie then put the middle of the string in the middle of the glue, then lay the points of four folded circles in the glue. Make sure that each fold of the folded circle continues the same direction. As soon as that glue has cooled then put a good dab of glue in the middle of the folded circles and then add the last four folded circles Place these so that the seams are covered of the first layer.


Open each petal and put a glob of glue in the middle. This will keep the petals open and give your flower a full fluffed out appearance.
I tried sewing my string on at the end and found that too difficult because of the glue. So it is best to add the string before your first layer.

You can add a button for a center if you like.

If you are making several, I found that it went quickly by cutting out everything first, then folding everything, then gluing. I am all about production and streamlining LOL.

Monday, December 19, 2011

Tee Shirt Scarves


My Art and Soul Group makes some sort of craft item a couple times a year but we are always looking for at least one gift we can make at Christmas time. This year Judi showed us how to make tee-shirt scarves.

I found that out of one X-large men's crew neck tee, without side seams, I could get 2 bracelets, 1 scarf and 8 circles (quart paint can size) for a flower.
If you have a rotary cutter it will make the job faster and easier.

Spread the tee out so that it is smooth and even. Cut about 1 inch apart thru one side of the tee but stop at least 1 inch from the other side. Do this for the body of the shirt and the sleeves see red lines.

Gently stretch each loop out it will turn into a string.

On one end choose 6 strings and cut one side only next to the top edge. Now you will have 6 long strings connected at the top. Separate by 2's and braid, when you reach the end leave about 8 inches of fringe and tie off the ends.

Now run your hand thru the middle of the uncut edge and gather together so you have one big circle and the single braid. Then grasp the end of the braid and loop it up making a shorter circle inside the large circle of strings.

You can then use the longest string of fringe from the braid to wind around the part gathered in your hand to bind it off. When you have covered the uncut edges then pull the end back thru to tie off.

You now have a tee shirt scarf!


Sunday, December 18, 2011

Winter Photo Session with Alice and Jason


View complete photos HERE.


It was a perfect winter afternoon to take photographs. It is a week before Christmas and the weather required only a light jacket, just enough sun was peeking thru the clouds to get some wonderful shots of this lovely couple. These are just a couple photos from their session. We later learned that there was a black bear and 2 cubs in the woods just above us. Too bad they didn't show up in any of the photos but I'm certainly glad they stayed away from us.

Sunday, December 11, 2011

Merry Christmas from the Penguins


On Sunday mornings, I stop at my friend Terena's house to pick up eggs. (They are the best tasting eggs in the world and supply is limited so I am not going to tell you where to find her, HA). When I got out of the car I was greeted by the cutest group of birds EVER! If you look closely you will be able to see where the chickens have visited the penguins and left a surprizing amount of feathers behind. I guess they were upset that these fine birds took over the yard.

Can you tell what she used to make them?
Here's a hint: old bottles, acrylic paint, cardboard, felt and I think the hats and scarves are from dolls or little socks. I bet they belong to her daughter, Morgan. hmmm I've got a bunch of little socks left over from making sock snowmen one year now I know what to do with them.

Kudo's to Terena for once again coming up with a novel idea that brought a smile to my face.

And thank you Terena for raising the bird house a little higher so I don't hit my head anymore!

Friday, December 2, 2011

Sourdough Cranberry Walnut Bread


This is a no Knead Bread, easy to make and my husband's favorite breakfast bread. I have my own starter that I keep in the fridge. There are a couple of sites that I like for recipes and instructions. http://www.breadhealthy.com and http://www.chefkeem.com. You should be able to find instructions there about the stretch and fold method and starting your own starter.
This third picture is of the dough after it has raised the 1st time. I use a stoneware bowl that I cover with a large plastic bag. After the 2nd stretch and fold I cut the dough in half , putting each half in a parchment paper lined proofing basket. In this 2nd picture you can see the proofing basket and the clay baking pot that I soak in water while the oven is heating up. I then pick up the bread by the parchment paper and put in the clay baker. You can see the parchment paper still in the baking pot. I found this to be much easier for me as I did not like cleaning up with out the parchment paper.
Here is a close up of the baking pot with the loaf of bread now removed
from the parchment.

My Recipe
3 cups of whole wheat flour
2 cups of whole grain spelt flour
2 cups of water when using spelt without the spelt and using other flour only use 1 1/2 cups of water
3 Tablespoons of Honey
1 1/2 teaspoons of salt
1 1/2 teaspoon of yeast
1/4 cup starter
1/2 cup cranraisins and 1/2 cup chopped walnuts. (I'm guessing here on the fruit and nuts, as I don't measure, adjust to your taste)
Bake at 450 for 35 minutes with the lid on then another 10 minutes without the lid.

Add and stir all wet ingredients first then mix salt with flour and add to wet ingredients. Mix well. You should now have a wet, shaggy dough. Cover with a plastic bag and set in a warm, draft free area for 1 hour.

After 1 hour you are ready to do your first stretch and fold. To do this, separate dough from bowl with a dough scraper, add a little olive oil around the bowl so that dough does not stick to bowl, Then think of the dough having 4 sides. Grab the first side and pull up stretching the dough then fold it over to the other side of the bowl. Now rotate the bowl 1/4 turn and do the same maneuver until you have done all 4 sides. Now dust hands and bread with flour then cover again with the plastic bag. Do this a total of 3 times always recovering.
The last time divide dough and put into parchment covered proofing baskets. I only have one proofing basket so I found a corning ware dish about the same size of my other clay baking pot (not shown) and I use it as a proofing basket and it seems to work just fine.

Bake at 450 degrees in a preheated oven for a total of 45 minutes. 35 minutes with the lid on and 10 minutes without the lid.

After it has completely cooled on a wire rack, I store the bread in a ziplock bag with the parchment paper. Since we keep our bread in the refrigerator the paper seems to keep extra moisture from forming.

This recipe was adapted to fit our tastes. You would not normally add yeast to sourdough as the starter is your fermenting agent. The bread is very dense and moist. The cranberries add just the right amount of sweetness and the walnuts give it a lovely crunch. You can of course substitute fruit and nuts of your choice.

Monday, November 21, 2011

My Mother-in-law is a treasure!

I love surprises and my Dear Mother-in-Law, Elida is always coming up with some thoughtful little gift that makes me feel so special. On our visit to Michigan this summer for my husband's 40th high school class reunion I received this set of kitchen towels and dish cloths. In my kitchen I have double ovens and I like to decorate by hanging colorful towels for the season over the handles. So now I have a new set from my ovens and to make it even more special I took a piece of brown scrapbook paper and using a calligraphy marker wrote familia then from my ribbon collection I added a green bow and a large headed white pin to attach it to the towel. I now have a wonderful memory and decoration that will last all the way until time for Christmas decorations which are coming up this weekend.

Saturday, November 12, 2011


My Garden club, "Garden Path" and Art Club, "Art and Soul", recently in 2 seperate meetings got together and made these fabulous concrete dishes or bird feeders or bird baths (whatever you want to use them for).

Photo #1 shows three uncleaned bowls
Photo #2 shows a partially cleaned bowl
Photo # 3 shows a clean, unsealed bowl with 2 fall leaves posed on top, artsy :)
Photo # 4 shows a clean bowl and 2 uncleaned bowls
You are seeing unsealed bowls with the natural concrete color, this was my preference.

These were so much fun and really easy to do (because in each case we were fortunate to have one of our husbands mix the quickcrete) Thanks, Lester and David and Jason who did some clean up of the sand in the second batch! You guys so ROCK!

Here are some basic instructions in case you want to do this yourself and you can also google concrete leaf bird feeders.

You will need, leaves of the size dish you want to make, rubber gloves, play grade sand, quickcrete with gravel, and concrete dye if you want to tone your concrete. There are many colors available at your local hardware store where you can get all of these supplies but it is expensive in comparison to the other supplies. A wheelbarrow or big plastic tub to mix the crete in and a hoe to mix with. Water source. (right here is a good spot to find someone with muscles to mix the crete and clean up the tools after LOL).

I find being bent over to work is very hard on my back so having some sturdy folding tables to work on was great. Next make a domed pile of sand on your table, pat the pile firm, then keep checking to see if it is at least 4 inches of sand between the edge of your leaf and the table.

Place the leaf face down on the inverted bowl shaped sand. If the stem of your leaf sticks straight up and you do not want a drainage hole, clip it off at this point. Put on rubber gloves and scoop crete by the handfuls and smooth over your leaf. You want the crete to be a little over 1 inch thick. Keep adding concrete until your leaf is covered and has extend past the edges of the leaf about an inch. Smooth the concrete and add extra to make a base if you want. I did not add a base as my leaves were not that large but I did make sure that there was enough of a flat area built up so that my leaf would "sit" level.

Make as many as you have supplies for. Note - have all your sand mounds set up before you mix the concrete as you don't want it to set up before you are done. If you have done this outside (vs. your garage) then cover with trash bags or plastic and let sit for 48 hours. Rain was a real possibility and you don't want them to be rained on. After 48 hours you are ready to take the wire brush and clean them up, seal and or paint as you prefer.

Congratulations! You now have wonderful presents for your friends or special one-of-a-kind garden art. Now wasn't that easy?

more projects to come in the future so remember to check back in. Happy Fall!